American Fuzzy Lop is a set of utilities that aid in fuzzing applications for bugs, some of which can be exploitable. This blog post will be the first of two or three that cover using AFL to automatically find bugs in software. Using a real world example, we will set up AFL, compile and instrument the software to fuzz, then go over any results we find.
We will be fuzzing a version of tcpdump which is contains a few heap overrun bugs in the parsing code of pcap files. But before we begin, we should set up our system with AFL. I prefer to have AFL work within a chroot to keep my base system clean, so the first thing we will do is set up a small Ubuntu chroot that we can install AFL and the vulnerable software in.
First, let’s create a directory to contain all of the things we will need to start fuzzing. I simply call my directory afl.
mkdir afl
cd afl
Then, within the afl directory, I keep a small bash script that creates a chroot of the trusty version of Ubuntu.
debootstrap --variant=buildd trusty chroot http://mirror.pnl.gov/ubuntu/
mount -o bind /proc chroot/proc
mount -o bind /dev chroot/dev
mount -o bind /dev/pts chroot/dev/pts
mount -o bind /dev/ptmx chroot/dev/ptmx
cp /etc/resolv.conf chroot/etc/resolv.conf
cp /etc/apt/sources.list chroot/etc/apt/sources.list
chroot chroot/ apt-get update
chroot chroot/ apt-get upgrade -y
chroot chroot/ apt-get install vim screen -y
chroot chroot/ apt-get install build-essential -y
rm afl-latest.tgz
wget http://lcamtuf.coredump.cx/afl/releases/afl-latest.tgz
cp afl-latest.tgz chroot/root
This bash script, which I called build_chroot, first creates the chroot with debootstrap. It then mounts my /proc, /dev, /dev/pts, and /dev/ptmx into the chroot so that I can have internet and use screen within the chroot. After mounting the directories and devices into the chroot, I copy over the resolv.conf and the sources.list from my system into the chroot. After these have been set up, within the chroot environment, I update and upgrade the system with apt, then install some basic packages, vim and build-essential. Once all is said and done, I download the latest version of afl then copy it into the /root directory of the chroot for installation later.
Next, I need to enter the chroot environment, install afl, and set up the environment a bit more so we can build and instrument the software we will be fuzzing, tcpdump.
sudo chroot chroot
cd /root
tar xzf afl-latest.tgz
cd afl-1.83b/
make && make install
apt-get build-dep tcpdump
apt-get install wget
cd ..
wget http://www.tcpdump.org/release/tcpdump-4.6.2.tar.gz
tar xzf tcpdump-4.6.2.tar.gz
I now have afl installed within the chroot, as well as the source code for tcpdump downloaded and decompressed in /root. Now I need to build and instrument tcpdump using the afl-gcc binary. Basically, afl-gcc will insert assembly instructions into the resulting tcpdump binary that will provide feedback to another afl binary, afl-fuzz. I will use afl-fuzz later on. To build tcpdump with afl instead of the default gcc compiler, I will set the CC environment variable to the afl-gcc binary I installed previously.
cd tcpdump-4.6.2
CC=afl-gcc ./configure
make
While building, you will see a few extra messages printed to the screen from afl-gcc that look like the following:
afl-cc 1.83b by <lcamtuf@google.com>
afl-as 1.83b by <lcamtuf@google.com>
[+] Instrumented 497 locations (64-bit, non-hardened mode, ratio 100%).
If you see these messages during compilation, this means you are compiling and instrumenting the tcpdump binary with the gcc wrapper installed by afl, afl-gcc. Once completed, you should have an instrumented tcpdump binary at the root of the tcpdump-4.6.2 folder. Now I can begin fuzzing tcpdump. The archive of afl source code contains some example files you can use when fuzzing applications, and one of these files is a very small pcap file. This is what I will use as my single testcase to mutate and feed to tcpdump.
cd /root
mkdir testcases findings
cp afl-1.83b/testcases/others/pcap/small_capture.pcap testcases/
Now we can begin fuzzing tcpdump with afl-fuzz
afl-fuzz -i testcases/ -o findings/ tcpdump-4.6.2/tcpdump -nr @@
The afl-fuzz binary requires you to tell it where the testcases to feed and mutate will exist with the -i argument. The -o argument is where afl-fuzz will save its current state and any files that result in hangs or crashes in the application. Running this command, you may get an error about the system being configured to send core dump notifications to an external utility. To disable this and let the fuzzing continue, run the following command and try again:
echo core >/proc/sys/kernel/core_pattern
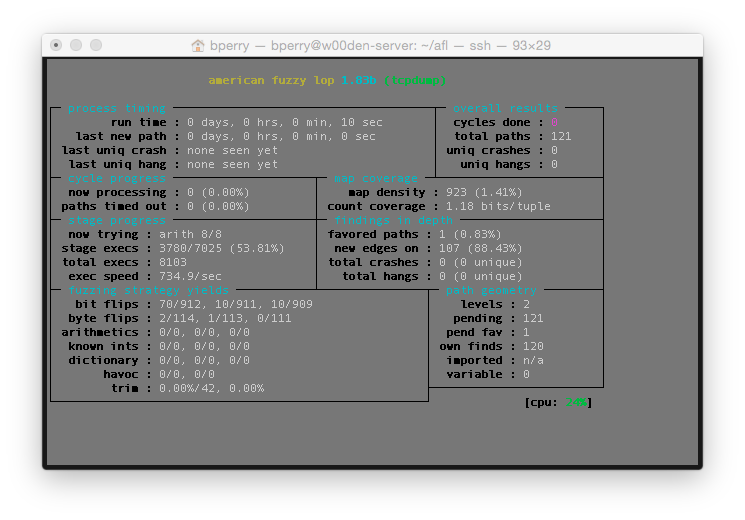
If all went well, you should see a 1337 UI detailing afl’s current fuzzing status like the following:

The next post will cover starting and tracking a master fuzz process and multiple slave processes, then tracking down and verifying crashes.